At school I had an art teacher who said 'A line is a journey from point to point.' That phrase meant both something and nothing. In the same way, a painting is a journey between a blank sheet of paper and one that is splotched with paint (with varying degrees of success.)
But to be a painter you have to keep on truckin! And keep on tryin'
You have to start somewhere!! Be it with a pencil scribble or a dab of paint.
I thought you might be interested in my process of creating a watercolor picture step by step so you can see how I do it. You never know, you might just learn something.
First, before we begin, look at your sheet of blank watercolor paper.
What do you feel?
Nervousness? Or maybe a smidgin of terror?
If like me you often think, help I am staring at a blank sheet of paper and don't know where to start, remember that a good place to start is with a wash. In this case I was painting a sunset so I diluted red, yellow and blue with water and did my first wash.
Slop the paint all over the place in several different directions.
When it had dried my first wash looked like this:
The second wash was more concentrated and I liberally used my water sprayer to keep things moist:
Working wet in wet I started adding in the skyline and the boat dock.
At this point I was happy with the airiness of the sky but I felt the bridge was too blue so I warmed it up with some warm browns. Also I felt that the angle of the dock wasn't dramatic enough so I made some adjustments. I liberally added another wash of red and one of yellow.
Then I decided to add some pastel highlights in warm golden tones to the water to bring it to life and to add dark green pastel to the horizon to give better perspective.
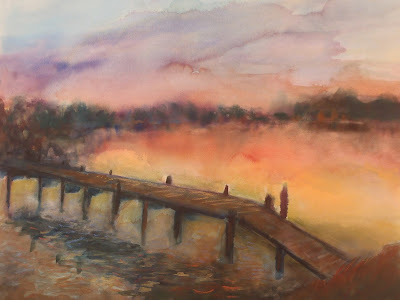
Finally I thought I had captured the view and the light glittering on the water and decided to leave it like this:
 |
| Sunset at Middle River, 2013 by Emma Kaufmann |
I am pretty happy with the final picture. It is a view of a sunset at Middle River. I think the angle of the dock gives some added drama to the gorgeousness of the sunset.
Let me know what you think and hope you have enjoyed coming on my journey with me!!
Do stop by again soon.
Prints, mugs, cushions and other items of this painting can be bought HERE at Redbubble.


